We create a theme for Sony in the proprietary application Theme Creator step by step. Detailed instructions and helpful tips are included.
Content
- Installing the necessary software
- We make new design elements
- Configuring Sony Theme Creator
- Create a theme
- Export the theme to your phone
- Conclusion
Installing the necessary software
To work with the Sony Theme Creator application, we need a computer based on Windows, Linux or Mac OS. Follow the link and download the ZIP folder.

Unpack the ZIP folder to any convenient location on your PC. There should be a theme-creator-v1_5_0.jar file inside the folder, but we don't touch it yet and move on.
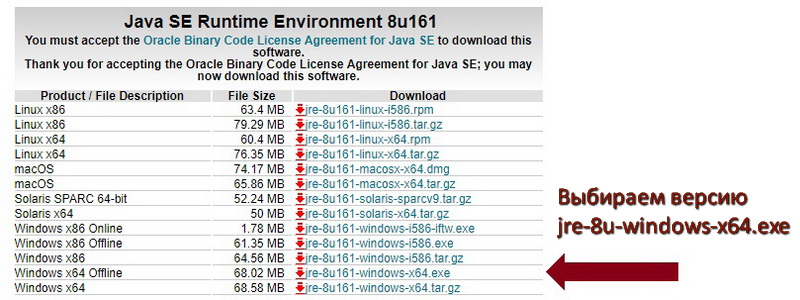
Download and install Java version 8 (according to the bitness of your system, here for x64), on the download page, do not forget to agree to the license terms by checking the box. The downloaded file must be named jre-8u161-windows-x64.exe for Windows (version 9 is not suitable).
If you had a different version of Java on your computer, it is better to uninstall it in advance. In case of any further problems, uninstall Java through the standard 'Uninstall a program' menu and install it again after restarting the PC.
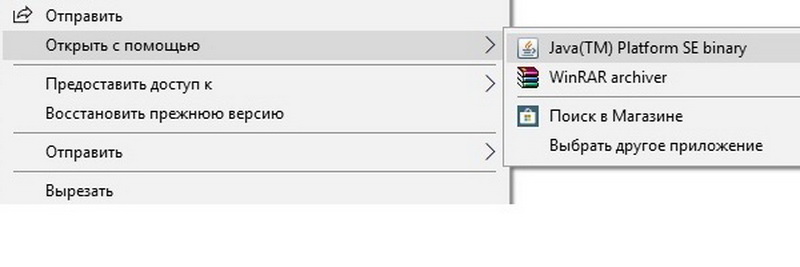
Install Java, agree to all conditions by default. Now we have something to open our downloaded file with .Jar resolution. To do this, right-click on the theme-creator-v1_5_0.jar file and select 'Open with' in the context menu, then select Java (TM) Platform SE binary in the drop-down list of applications:
The file was associated with the Java platform, and now, for the convenience of subsequent launches, you can bring the application shortcut to the desktop. Close the launched Theme Creator application.
We make new design elements
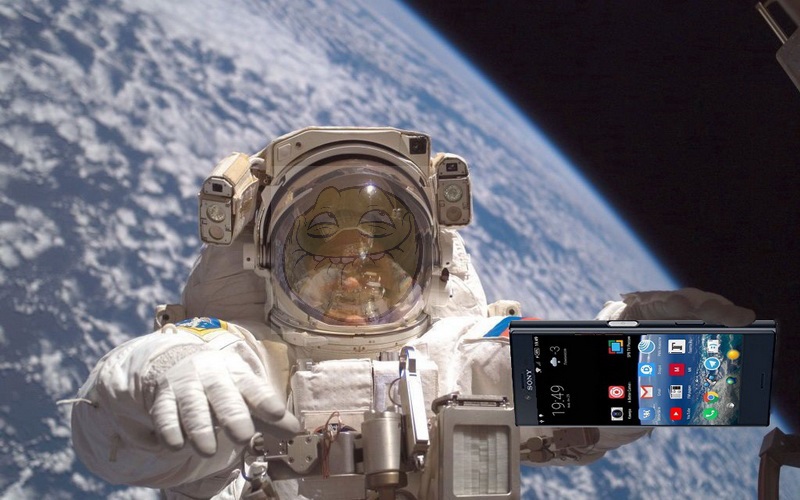
Although Theme Creator allows you to change almost all graphic elements, for the first time I suggest limiting yourself to the home screen buttons, desktop wallpaper and lock screen, as well as music. To create a new theme, we will need various graphic elements, and it is better to prepare them in advance. Sony Xperia Compact, which has HD screen resolution, will be used as the carrier of the new theme, so the sizes of the pictures will be indicated accordingly. And then it's time to choose an idea for a future theme. In our case, it was decided to focus on astronautics.
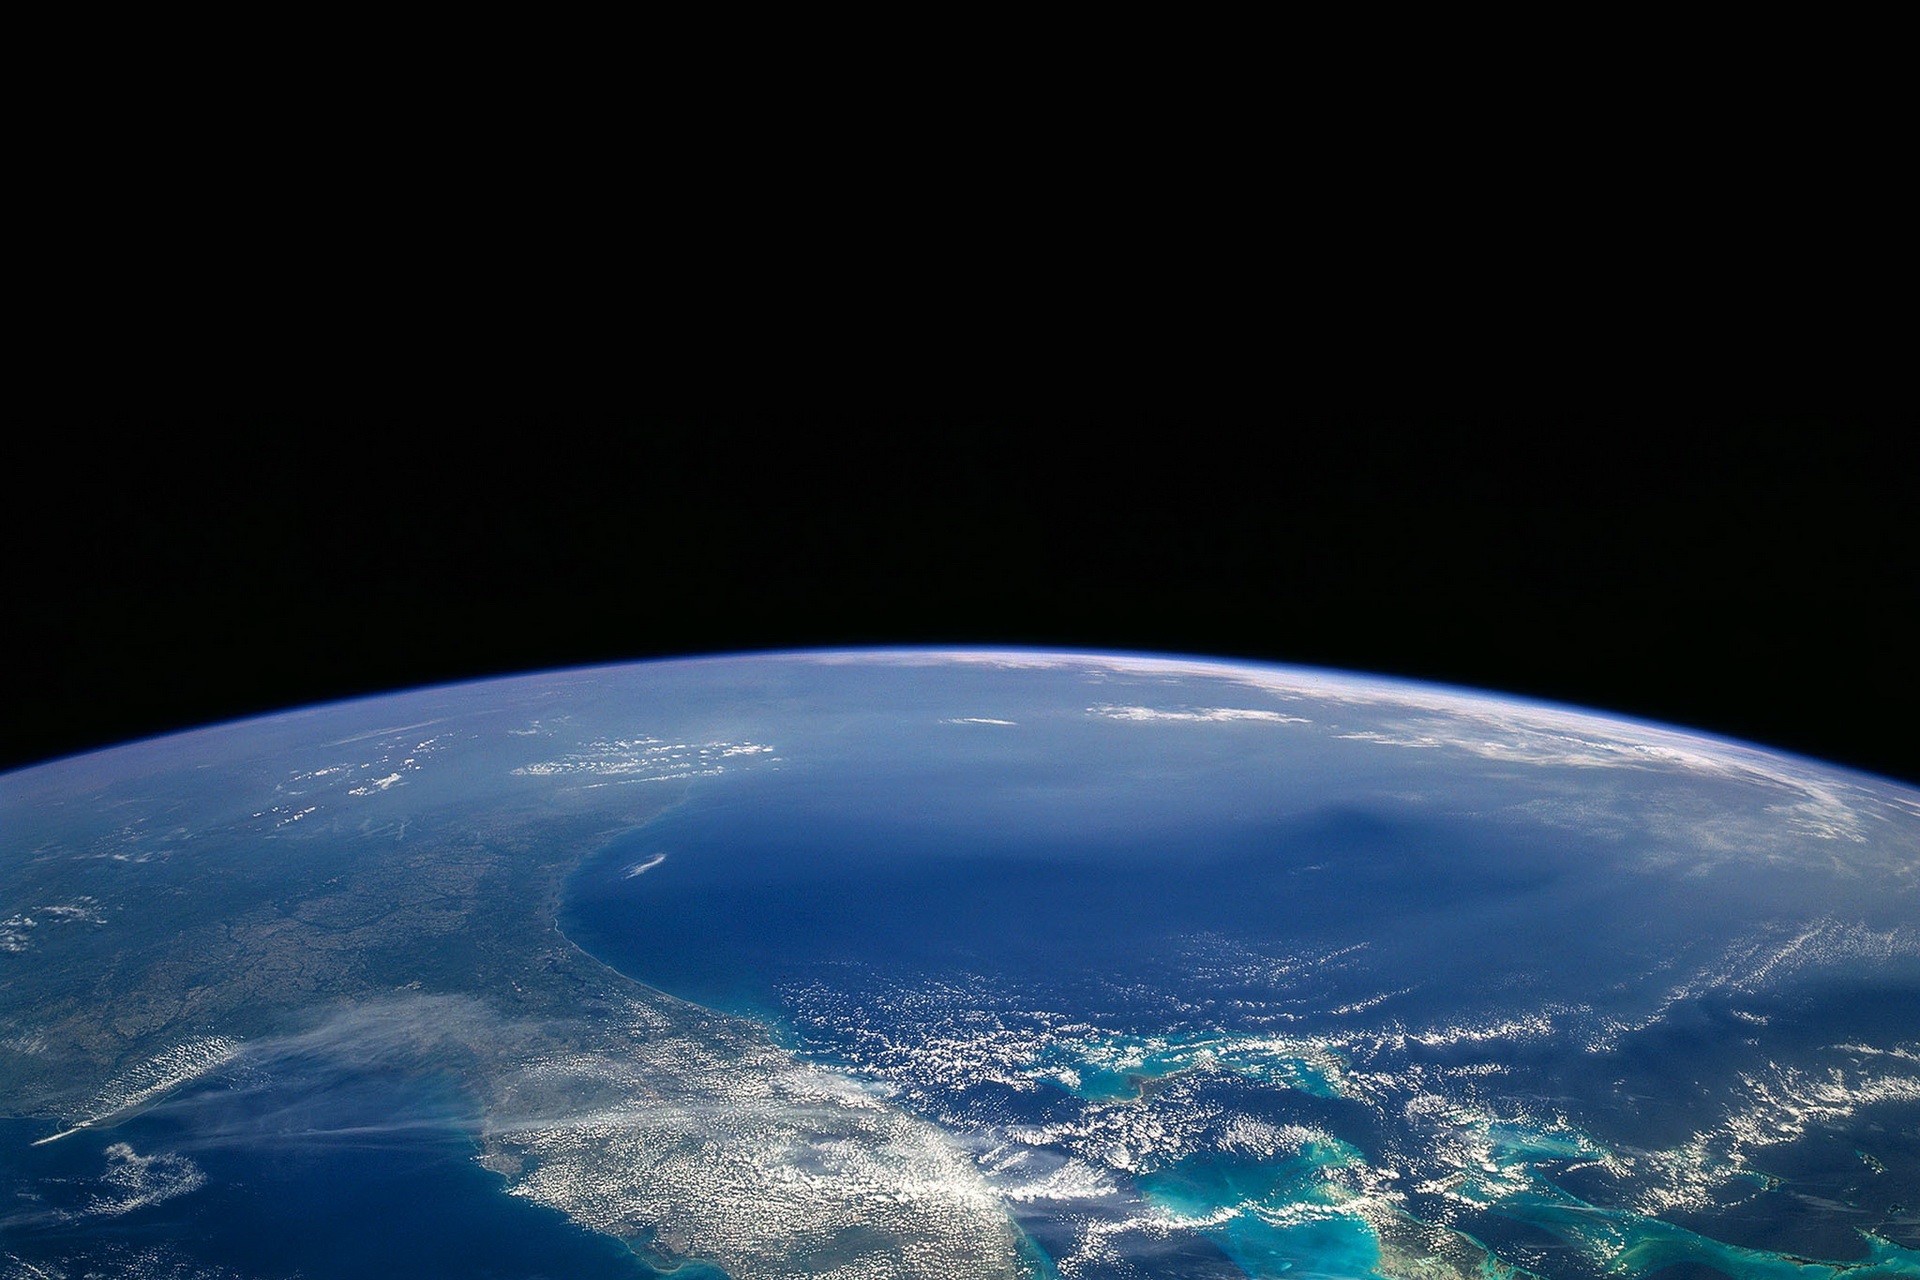
Home screen wallpaper – the stock must have a resolution of 1920×1280. It should be borne in mind that at the top of the screen we usually have a clock or weather widget, so it is advisable to choose the image so that this part has an even background, light or dark. There are many beautiful photos of space on the Internet, it was decided to choose this one:
Lock screen wallpaper – when working with a smartphone, you can see that this image is always static and in its place. Therefore, we also need a picture vertically oriented, with a resolution of 1280×720 pixels. It was decided to choose an image of the launching rocket:

The image is rotated sideways, in the original it is positioned vertically
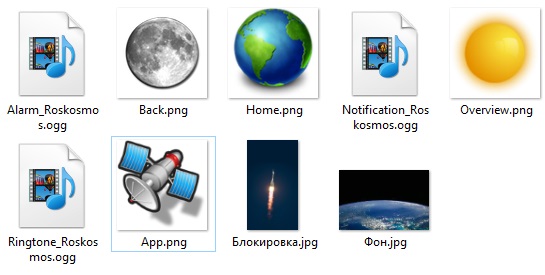
Home screen buttons – we need four images with a resolution of up to 150×150 pixels and in PNG format (with transparent edges). 150 pixels is the maximum possible size, but, despite this, I highly recommend using 128×128, since when the screen is horizontally positioned, the buttons are a little 'squeezed', apparently, they do not have enough space. But 128×128 is the golden mean. We select pictures according to the thematic idea. Home button – planet Earth, Browse button (right square) – Sun, Back button – Moon, open all applications button (APP) – satellite.
There are a couple of tips for getting started. The easiest way to search for skin images is with your browser. Semitransparent PNGs are best searched for by queries like 'Satellite PNG'. After issuing the result, we refine the query in the search engine tools, first choosing 'pictures', and then the size – 'small size'. It is most convenient to resize such PNGs without losing transparency in ACDsee, Paint.net and the like programs. Alas, the Paint editor, native to Windows, only spoils them. Often you will come across images in the .Ico format – these are icons for the desktop Windows, in order to pull the image out of them, I recommend using the Icofx 3 application, which is easy to find on Runet. Ultimately, you should have a folder with the collected material:
Sony Theme Creator has support for importing from Adobe Photoshop templates, which, of course, will appeal to advanced users.
Musical arrangement – we need three music files: a ringtone, an alarm melody and an alert signal (SMS, etc.). Theme Creator works with MP3 and OGG files, however, if you want less problems, then of course choose the OGG format as the most 'native' for the system Android. In the depths of the Internet, my favorite space music was easily found, as well as two alarm signals, one of which seems to be from a submarine, and the other from an X-ray machine. But not the point, it will do for a space station. We cut the music as we like using any editor and get:
Configuring Sony Theme Creator
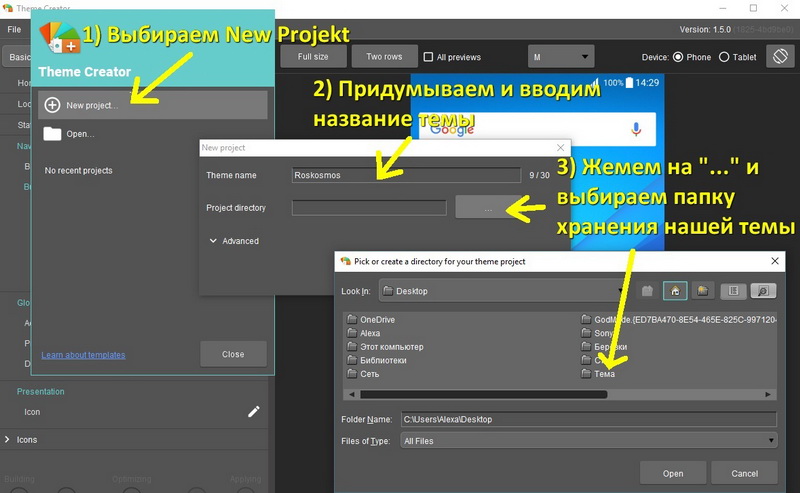
On first launch, you will be prompted to create a new theme or edit an existing theme. Select 'New Project' and get into the context menu of the project settings. Enter the name of the future theme and specify the folder where temporary files will be stored:
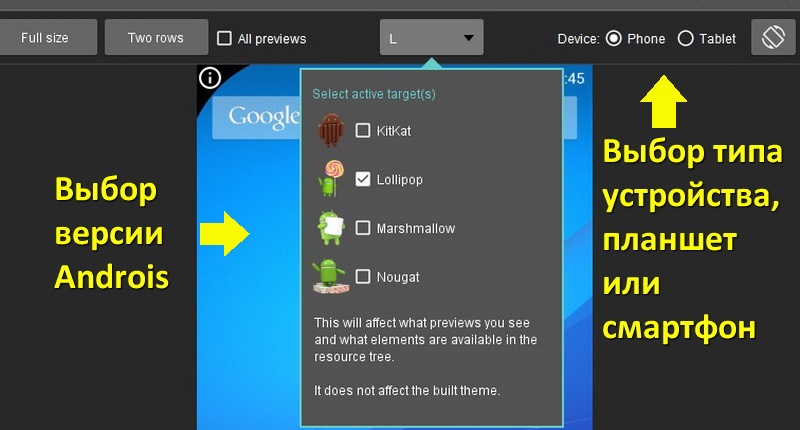
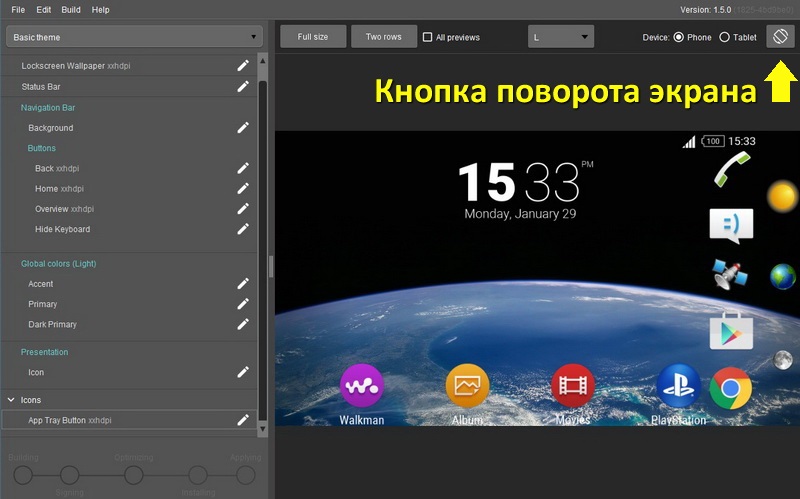
Before installing the wallpaper and buttons, you must select the version Android of our device and its type. To do this, on the right side of the interface, from above, select Phone (smartphone) or Tablet (tablet).
Now you can start the fun part, namely, the creation of our theme.
Create a theme
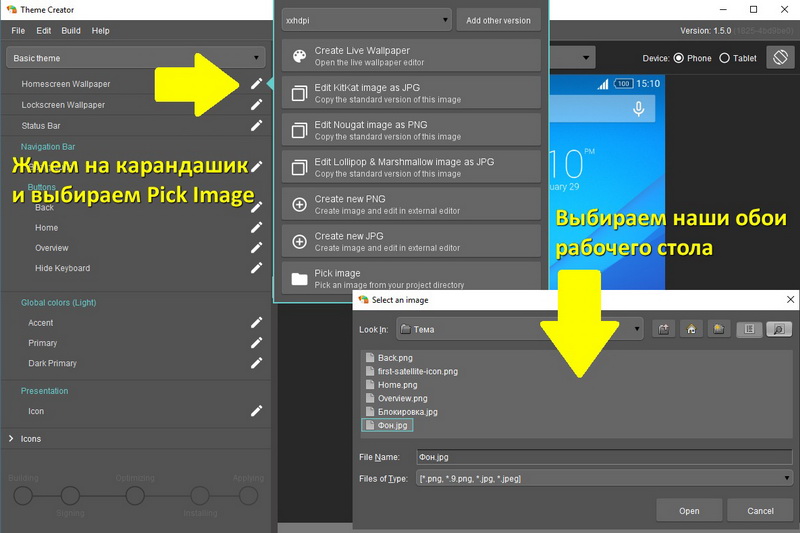
The whole process of creating a theme is reduced to throwing our prepared material into the appropriate sections of the Creator. Click on the pencil image opposite the 'Homescreen Wallpaper' and select from the drop-down menu:
Note that the 'Home', 'Back' and 'Overview' buttons are visible. But the 'App' button is hidden under the spoiler of the 'Icon' header. Ultimately, you will see all the changes made in the program window and you can change any element at any time. That was done, namely, in the editor, the sizes of the images of the Moon, Earth and the Sun were changed so that they somehow corresponded to the real ones. You can also rotate the image to horizontal orientation at any time and evaluate the results:
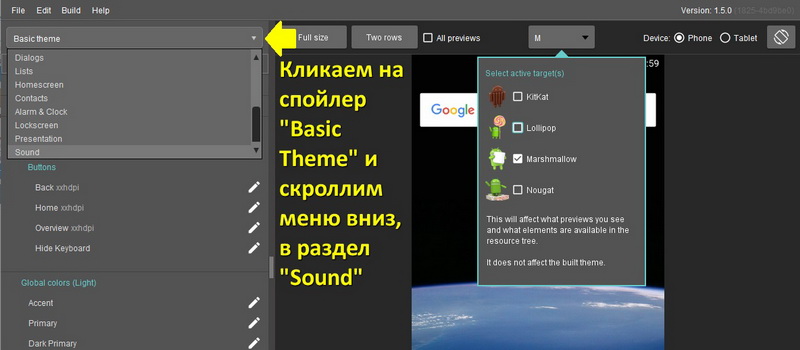
And now a little about the sad, in Android Lollipop does not implement the use of themes with a change in the sound environment. This option is implemented starting with Android Marshmallow and higher. I had to set sounds manually, but newer Sony owners do not need to do this. Click on the 'Basic Theme' heading and in the menu that opens, go to the very bottom, to the 'Sound' section:
The sound is installed in the standard way: click on the pencil opposite the sound and select your sound in the built-in explorer:

A bit about Sony's theme policy. The same themes are universal for all versions Android. Those. You can create a theme for Android Nougat, but on a Lollipop device, only the wallpaper and other graphics will change, but the sound will remain the same. As for other subtle settings, for example, the background color in the system menus, etc., it is better to choose your version Android when creating a theme, out of harm's way.
Important note: If your image (or sound) does not fit the editor by any criteria, then you will see a red icon opposite the corresponding menu item. To fix the situation, click on the pencil again and delete the unsuitable file (in the menu, item 'Remove').
Export the theme to your phone
There are two ways to export a theme to your phone.
Method 1
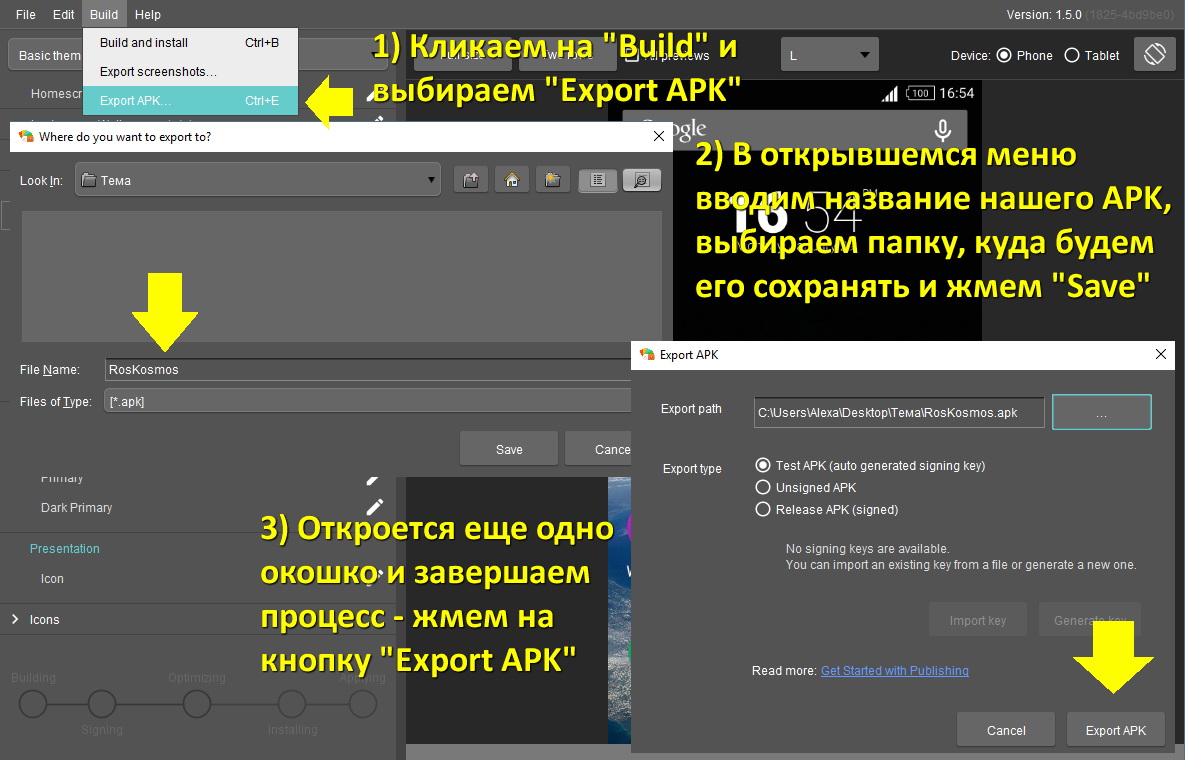
Create a complete .APK file, transfer it to your phone and install it manually. To do this, go to the 'Build' section in the program menu and click on the 'Export APK' item. In the menu that opens, click on '…' opposite the 'Export patch' inscription and select through the explorer the place where we would like to save the finished APK file, and enter the file name in the empty field. Do not touch anything opposite the 'Export type' inscription, let the default value remain, i.e. 'Test Apk'. Then click on the 'Save' button and in the next window on 'Export APK'. The screenshot shows a collage with actions in turn:
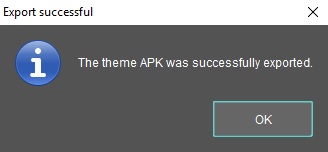
If you did everything correctly, you will eventually see the inscription 'The theme APK was successfully exported':
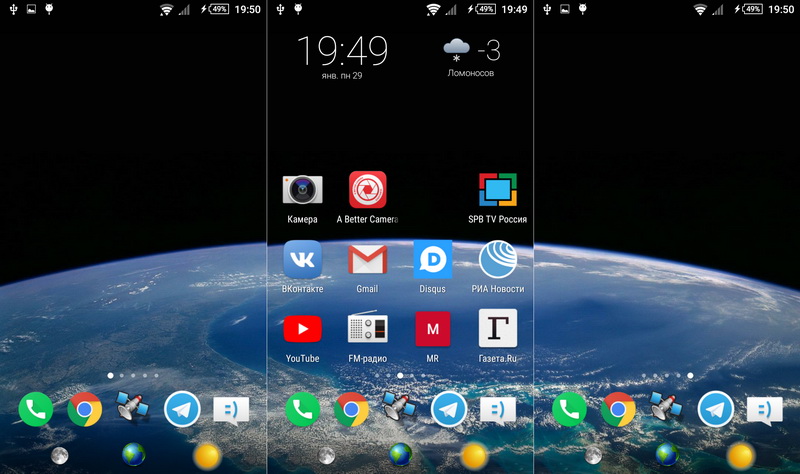
Now you can transfer to your smartphone and install our theme. Hurray, victory!
Method 2
It is recommended to use it on your personal computer, to which unauthorized persons do not have access. The transfer and installation of the theme takes place with a USB connection. It makes no sense to write detailed instructions on installing the ADB driver and enabling USB debugging in the phone menu, the method is universal and the network is full of information on this topic. Let's assume that all this is already there. So, we connect our smartphone to a PC in USB debugging mode and press the button in Sony Theme Creator:
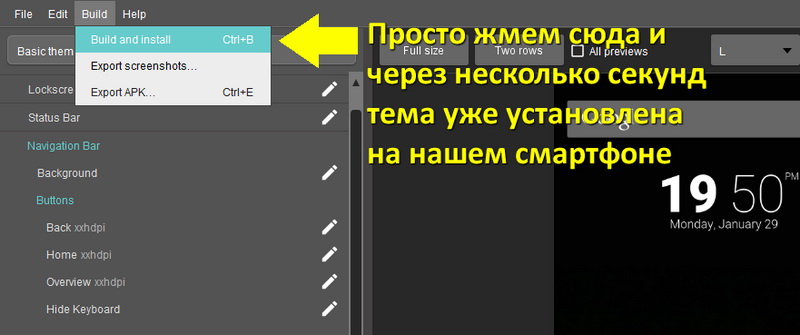
You don't need to do anything else, in a few seconds our new theme will be on the phone.
Conclusion
In conclusion, I would like to express warm words to Sony. Firstly, for the fact that the tool from the section for developers is openly available and no dancing with a tambourine is required to download it. Secondly, because the application is written in the JAVA language, as a result of which it takes up very little space and works very quickly. And it has almost absolute compatibility with all devices where you can install the corresponding version of JAVA.
This article does not cover deeper interface changes. In my humble opinion, this is not necessary at all, but if you are interested, then you will definitely figure it out, the principle of working with the editor remains the same when changing any elements.
Friends, tell us, have you tried to change the design of your smartphone more seriously than just changing the wallpaper, and how successful was it? And, in your opinion, isn't it more interesting to change the appearance of the native launcher than to install a third-party one, with ads and a bunch of unnecessary whistle settings?